Introduction
Your kitchen feels like a box. You cook in there alone while everyone else talks in the living room. The space feels dark, cut off, and smaller than it actually is.
You are not imagining it.
Closed kitchens do that. Walls block light. Doorways shrink your view. And before you know it, a perfectly good home feels cramped.
The good news is you do not always need to knock down walls to fix this. Some of the best open concept kitchen ideas cost almost nothing. Others take a weekend. A few require a contractor. But all 15 ideas on this list work in real homes, for real budgets, right now in 2026.
You will learn which changes give you the most space for the least money. You will see which ideas work for renters. And you will know exactly where to start.
These are open concept kitchen ideas that actually change how your home feels. Not just how it looks in a photo.
What Makes an Open Concept Kitchen Actually Work
Before you pick an idea, you need to know why open kitchens feel bigger. It comes down to three things: sightlines, light, and flow.
Sightlines are how far your eye can travel before hitting a wall. The longer the view, the bigger the space feels. Light fills gaps and makes walls feel further away. Flow means you can move from kitchen to living room without squeezing through a doorway.
Most closed kitchens fail on all three.
According to the National Association of Realtors, open floor plans are consistently one of the top features homebuyers ask for. The U.S. Census Bureau reports that around 63% of new single family homes built in recent years feature open floor plan kitchen design. Builders are not doing this for no reason. Buyers will pay more for it.
The biggest mistake people make is trying to fix one thing and ignoring the others. You can remove a wall but still block sightlines with the wrong furniture. You can add a window but kill it with dark cabinets. Open concept kitchen ideas work best when a few of them work together.
Start by standing in your kitchen and asking: what stops my eye first? That is usually the first thing to fix.
Idea 1: Open Up a Non-Load-Bearing Wall

This is the most direct fix. A wall between your kitchen and living room is probably the single biggest reason your space feels closed off.
But before you pick up a sledgehammer, you need to know if the wall is load bearing. A load bearing wall holds up the structure above it. Removing it without a beam will cause serious damage.
Here is how to check. Look in your basement or attic. If the wall runs perpendicular to the floor joists above, it is likely load bearing. A structural engineer can confirm this for $300 to $500. That money is worth it.
If the wall is not load bearing, full removal costs $500 to $2,000 depending on what needs patching and repainting. If it is load bearing, you can still remove it, but you need a steel or LVL beam installed. That job runs $3,000 to $10,000 or more.
You do not have to go all the way. A pass through opening, even just 36 inches wide, dramatically changes how connected the kitchen feels. You can frame it with a wood header, add a small countertop for bar seating, and call it done.
Check your local building department before starting. Most wall removals require a permit. Getting one protects you when you sell.
Bottom line: Even a partial wall opening can transform a kitchen. Start with a contractor conversation before swinging anything.
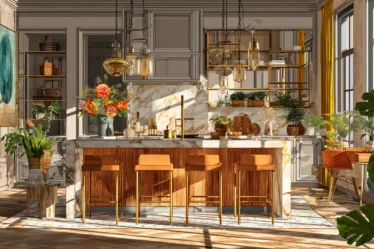
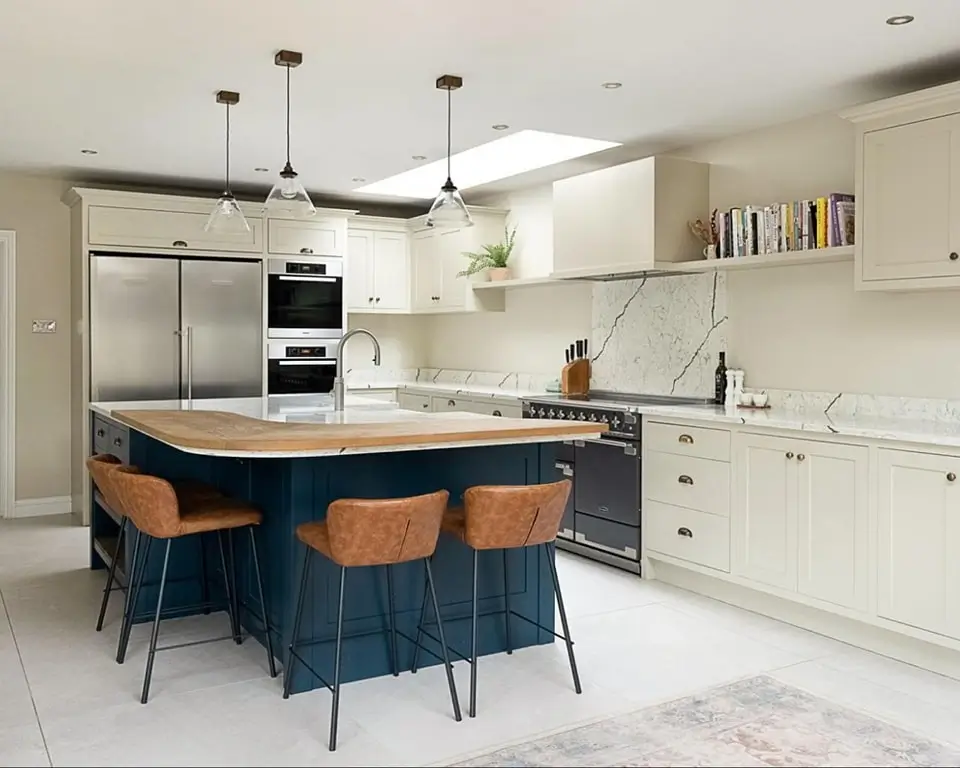
Use a Kitchen Island as a Room Divider

You do not need a wall to separate your kitchen from the living area. An island does the job better. It defines the kitchen zone, adds counter space, and keeps the sightline completely open.
A peninsula works even better in smaller kitchens. It attaches to an existing wall or counter, so you need less floor space. It still gives you seating, storage, and that visual separation without the cost of a freestanding island.
For the countertop, butcher block is the most affordable option at around $30 to $60 per square foot installed. Quartz looks cleaner and holds up better to spills, but runs $70 to $150 per square foot. A waterfall countertop, where the material drapes down the side of the island, creates a polished look that makes even a modest kitchen feel high end.
Choose counter height seating (18 inch seat, 36 inch counter) over bar height if you want the island to feel more casual and connected to the room. Bar height stools create more separation, which works in bigger spaces but can feel awkward in small ones.
If you rent and cannot build anything permanent, a rolling island from IKEA, Home Depot, or Wayfair costs $150 to $600 and can be moved or taken with you. It is not forever, but it works.
Bottom line: An island creates the open floor plan kitchen design feeling without touching a single wall.
Use the Same Flooring in Both Rooms

This one surprises people. But the line where your kitchen floor meets your living room floor is doing more damage than you think.
A floor transition is a visual stop sign. Your eye hits it and registers “new room.” That tiny strip of metal or change in material tells your brain the space ends here. And so the room feels smaller.
When you run one floor type continuously from the kitchen through the living area, the space feels like one big room. Your eye travels further. The whole area reads as larger.
Luxury Vinyl Plank (LVP) is the most practical choice for this in 2026. It is waterproof, scratch resistant, and looks almost identical to hardwood. It costs $2 to $7 per square foot installed. You can run it from your kitchen through the dining area and into the living room without any worry about water damage near the sink.
Hardwood works too, but costs $8 to $15 per square foot installed and needs more protection in a kitchen. Large format tile, like 24 by 48 inch slabs, reduces the number of grout lines and creates a cleaner, more open look.
Stick to warm tones if your home gets a lot of natural light. Cool tones if your space is darker. The goal is continuity, not contrast.
Bottom line: One floor, two rooms. It is one of the cheapest ways to make a small kitchen open concept feel twice as big.
Take Your Cabinets All the Way to the Ceiling

Look at the gap above your upper cabinets. That dead space is shrinking your kitchen.
When cabinets stop at 7 or 8 feet and your ceiling sits at 9 feet or higher, that blank wall zone makes the room feel shorter. Your eye stops at the cabinet top instead of traveling up.
Floor to ceiling cabinets fix this by giving the eye somewhere to go. The room feels taller. The kitchen feels more intentional. And you gain real storage space in the process.
You do not need a full kitchen renovation to try this. The IKEA SEKTION system allows ceiling height customization for under $3,000 for a full kitchen, depending on layout. Adding stacked upper cabinets above existing ones is another option, as long as the wall can support the weight.
For the very top section, use it as a display area for things you rarely access. Baskets, cookbooks, or decorative items work well there. A simple rolling library ladder keeps it reachable and adds visual character.
Color matters here. Paint the upper cabinets the same color as your wall and they almost disappear, making the ceiling feel even higher. Use contrast if you want a bold statement look instead.
Bottom line: The space above your cabinets is not wasted storage. It is wasted height. Claim it.
Use One Color Palette Across Both Rooms

Walk to the doorway between your kitchen and living room. Do the two spaces look like they belong to the same home? If the kitchen is white and the living room is navy, your eye registers a hard boundary even without a wall.
Color contrast creates invisible walls. A monochromatic palette removes them.
You do not need everything to match perfectly. You need the tones to feel related. A warm white kitchen flowing into a warm greige living room works. A cool gray kitchen with a sage green living room works. What does not work is a sharp contrast that makes the two spaces feel disconnected.
In 2026, the most popular neutral palettes for open plans are warm white, soft clay, greige (a mix of gray and beige), and sage green. These colors reflect light well and feel relaxed rather than stark.
The best part is you can test this without spending much. Both Sherwin Williams and Benjamin Moore offer free online room visualizers where you can paint your walls digitally before buying a single can. That alone can save you hundreds in regret.
Use texture to add visual interest instead of color. Matte and gloss finishes on the same cabinet color. Natural wood grain against painted walls. Linen fabric on furniture against smooth plaster. The variation keeps it from feeling flat.
Bottom line: Free color visualizers let you test this idea before spending anything.
Swap Upper Cabinets for Open Shelves

Upper cabinets are solid boxes mounted on your wall. They block light. They add visual weight. And in a small kitchen, they can feel like they are closing in on you.
Open shelves remove that solid barrier. Your eye passes through them. Light travels past them. The kitchen automatically feels lighter and more open.
Installing floating shelves costs $50 to $300 for a DIY job, or $400 to $1,200 if you hire someone. That is a fraction of what new cabinets cost, and the impact is immediate.
The honest downside is dust. Open shelves collect it. If you live somewhere dusty, cook heavily with grease, or have a busy household with kids, open shelves require more maintenance than cabinets. You will be wiping them down weekly.
The styling also matters. Shelves look great in photos because designers edit them ruthlessly. Use the rule of three: group items in odd numbers. Leave at least 30% of shelf space empty. Put the things you reach for most at eye level.
If you are not ready for fully open shelves, glass front cabinet doors give you the same airy look with protection from dust. Retrofit glass inserts cost $100 to $400 per door.
Bottom line: Open shelves are a weekend project with a major visual payoff. Just be honest about whether you will keep them tidy.
Add More Natural Light to the Kitchen

Light makes space. This is not a design opinion. It is how your eyes and brain work. A bright room feels bigger because you can see all of it clearly. A dark room feels smaller because your eye cannot reach the corners.
The best open concept kitchen ideas use light as a tool, not an afterthought.
If you can add or enlarge a window, do it. A window above the kitchen sink is one of the highest value upgrades you can make. It brings in light right where you spend the most time. Window enlargement costs $800 to $3,000 depending on size and wall type.
Skylights are another option, running $1,500 to $4,000 installed. If full skylights are too expensive, solar tubes (also called tubular skylights) cost $500 to $1,000 and bring in a surprising amount of light through a small ceiling opening. They work especially well in kitchens that share a roof with a sun exposed area.
If structural changes are not possible, focus on reflective surfaces. Glossy backsplash tiles bounce light around the room. A light colored countertop does the same. White or off white cabinet paint reflects more light than any dark color.
Keep window treatments minimal. Heavy drapes in a kitchen block the light you need most.
Bottom line: If you can do only one physical change to your kitchen, add a window. Light does more work than any other single upgrade.
Idea 8: Extend Your Backsplash Into the Living Space

A backsplash that stops at the kitchen wall edge creates a sharp boundary. Your eye follows the tile and then hits a blank wall and registers: kitchen ends here.
But what if the material did not stop?
Extending your backsplash tile, or a related texture, into the living area as an accent wall blurs that line. The kitchen and living room feel like they share the same design language. The boundary softens.
You do not have to tile an entire living room wall. Even running the same material up to where the wall meets the ceiling on one accent wall creates the connection you need.
In 2026, the most popular materials for this kind of treatment are zellige tile (a handmade Moroccan clay tile with an irregular surface), limewash paint (which has a similar texture to aged plaster), and shiplap (horizontal wood planks). All three read as intentional and current without trying too hard.
For renters or anyone on a tight budget, peel and stick backsplash panels cost $5 to $15 per square foot and are fully removable. They have improved significantly in quality and look far less fake than earlier versions did.
One pattern tip: bigger patterns with fewer lines make small spaces feel larger. A busy mosaic in a small kitchen adds visual noise. A simple large format subway or slab style tile keeps it clean.
Bottom line: Run one material across both rooms and the boundary between kitchen and living space nearly disappears.
Idea 9: Remove the Knee Wall Under Your Breakfast Bar
You probably have seen this in older homes. A raised breakfast bar with a solid wall underneath it, running from the counter to the floor. It was meant to create a casual eating area. Instead, it blocks the most important sightline in the whole kitchen.
That knee wall is the number one sightline killer in semi open kitchens.
Removing it is usually simpler than it sounds. If it is not load bearing, the knee wall comes down for $500 to $2,500 depending on how much patching and refinishing is needed. Once it is gone, you replace the solid support with either open legs, steel posts, or a waterfall countertop that supports itself.
If full removal feels like too much, there are two middle ground options. First, lower the wall so it sits at counter height (36 inches) instead of bar height (42 inches). That alone improves the sightline dramatically. Second, replace the solid drywall panel with tempered glass. Glass panel sections cost $200 to $800 for a 36 inch section and maintain a visual separation without blocking the view at all.
This change consistently appears as one of the most recommended renovations in home improvement forums where real homeowners share before and after results.
Bottom line: The knee wall under your breakfast bar might be the only thing standing between you and a fully open kitchen living room connection.
Idea 10: Use Recessed Lighting to Connect Both Rooms

One ceiling light in the middle of your kitchen does not light a kitchen. It creates a bright spot in the middle and dark corners everywhere else. Dark corners make rooms feel smaller.
Layered lighting is the fix. It means combining three types of light: ambient (general room light), task (light for work surfaces), and accent (light for visual interest).
In an open plan, recessed lighting grids that run continuously from the kitchen into the dining and living area create a unified ceiling plane. Your eye sees one continuous lit space instead of separate rooms with separate light sources.
Pendant lights over a kitchen island anchor the kitchen zone visually. Two or three pendants hung in a row above an island tell your brain: this is the kitchen area. But because they are hanging in open space rather than tucked behind a wall, they do not block anything.
Recessed lighting installation costs $100 to $200 per can when done by a licensed electrician. For a full kitchen, you might need 6 to 10 cans.
Smart lighting systems make open plans feel more flexible. Philips Hue starter kits start around $70. Lutron Caseta smart switches run $60 per switch. Both let you set different light levels for cooking versus entertaining without touching a single fixture.
Bottom line: Light your kitchen like a professional does: in layers, not from a single source.
Idea 11: Choose Furniture That Does Not Block Your View

You can do everything right in the kitchen and still ruin the open feeling with the wrong living room furniture.
A tall, bulky sofa placed with its back facing the kitchen acts like a soft wall. Your sightline stops at the sofa back. The kitchen feels cut off again.
Low profile sofas fix this. A sofa with a back height of 30 to 33 inches (from the floor) keeps the sightline traveling over it and into the kitchen. CB2, Article, and West Elm all offer options under $1,500 with this profile.
Acrylic or glass furniture takes it further. A ghost chair, a clear acrylic side table, or a glass coffee table takes up physical space without visual space. Your eye passes right through them. Interior designers use these specifically in small open plan homes for this reason.
The rule most designers follow: no piece of furniture in direct sightline of the kitchen should exceed 32 inches in height. That keeps the view clean from the couch to the stove.
Also, pull your furniture away from the walls. It sounds wrong but it works. Floating furniture toward the center of a room makes the room feel larger, not smaller. The space around the walls creates breathing room.
Bottom line: Furniture layout affects how open your kitchen feels just as much as what you do to the kitchen itself.
Idea 12: Add a Statement Range Hood or Ceiling Feature

Here is something most people overlook. You have been thinking about the walls. But your ceiling is doing nothing for you.
Drawing the eye upward is one of the fastest ways to make a room feel bigger. A statement range hood does exactly that.
A custom plaster hood runs $800 to $3,000. A DIY shiplap hood costs $200 to $600 in materials and can be built over a weekend with basic woodworking tools. Both versions take what is usually the most ignored part of a kitchen (the ventilation hood) and turn it into a vertical design feature that pulls the eye up.
Beyond the hood, consider what happens to your ceiling across both the kitchen and living room. A continuous ceiling treatment unifies both zones the same way consistent flooring does. Coffered ceilings add depth. Painted wood beams add warmth and character.
Faux wood beams are more practical than structural ones. They cost $20 to $40 per linear foot installed and are available at Home Depot, Amazon, and most building supply stores. They attach directly to the ceiling with adhesive and screws, no structural work needed.
Even something as simple as painting the kitchen ceiling the same color as the living room ceiling removes one more visual boundary between the two spaces.
Bottom line: Look up. Your ceiling is either dividing your rooms or connecting them.
Idea 13: Use an Area Rug to Define Zones Without Walls

Here is one of the cheapest and most effective open concept kitchen ideas on the entire list.
An area rug in the living room tells your brain: this is where the living room begins. Without one, the two zones bleed together in a way that actually makes the space feel less open, not more. It looks undefined. Rugs create clarity without adding height or blocking sightlines.
The single biggest mistake people make with rugs in open plans is buying one that is too small. A rug that does not fit under all four legs of a sofa looks like a bath mat. It shrinks the room instead of anchoring it.
For most open plan living rooms, you need at least an 8 by 10 foot rug. A 9 by 12 is better. Yes, it feels large when you unroll it. That is the point.
For the area near the kitchen, choose materials that handle real life. Indoor outdoor rugs are durable, easy to clean, and no longer look like they belong on a patio. Washable rug brands like Ruggable, Tumble, and Lorena Canals make full size options that go in a standard washing machine. In 2025 and 2026, these have become a go to choice for families.
Bottom line: The right size rug in the right spot defines your space for free. The wrong size rug makes everything feel smaller.
Idea 14: Declutter Your Countertops Completely

This is not glamorous advice. But it is the most honest thing on this list.
No open concept kitchen idea, no renovation, and no design trick will make your kitchen feel bigger if your countertops are covered in stuff. In an open plan, your kitchen is always visible. It is always part of the room. There is no door to close.
Every toaster, coffee maker, knife block, fruit bowl, and appliance sitting on your counter is competing for visual attention. Multiplied across a full counter run, that clutter makes your kitchen feel chaotic and cramped even if it is large.
The countertop rule is simple: if you do not use it every single day, it does not live on the counter.
That means the toaster, the blender, the stand mixer, all of it goes into a cabinet or pantry and comes out only when needed. Yes, this is slightly less convenient. But the trade off in visual space is significant.
Research from the Princeton Neuroscience Institute found that visual clutter competes for your brain’s attention and increases stress. An open plan magnifies this because the clutter is always in view.
For storage, pull out pantry systems from IKEA and Rev A Shelf make it easy to store appliances accessibly without leaving them out. The Container Store has drawer organizers that turn chaotic cabinets into functional ones.
Bottom line: Clean countertops do more for your kitchen’s open concept feel than any renovation.
Use Mirrors and Reflective Surfaces to Double Your Space Visually

Mirrors are the oldest trick in interior design and they still work better than almost anything else.
A large mirror on the wall across from your kitchen bounces light back into the space. Your eye sees the reflection and reads depth. The room appears to continue past the wall. It is one of the most effective visual space tricks that exists, and it costs less than most of the other ideas on this list.
A mirror that is 36 by 48 inches or larger, placed on the dining room or living room wall visible from the kitchen, can make the connected space feel noticeably bigger. Interior designers cite this as one of the most reliable ways to increase perceived room size, with some estimates suggesting a well placed large mirror can make a room feel up to 50% larger.
Mirrored backsplash tiles are another option. They cost $8 to $20 per square foot and are available at Lowe’s, Home Depot, and online tile retailers. They are especially effective in kitchens with good natural light, because the reflection amplifies it throughout the room.
If plain mirror feels too stark for your style, antiqued or smoked mirrors are trending in 2026. They have a slightly tinted, aged quality that feels warmer and more intentional than clear mirror while still doing the same visual work.
The one thing to avoid: do not place a mirror where it reflects clutter, a dark corner, or an ugly view. A mirror amplifies whatever it faces. Make sure that something is worth seeing twice.
Bottom line: A single large mirror costs $50 to $200 and delivers one of the biggest space multiplying results on this entire list.
How to Start This Weekend
You do not need to do all 15 ideas. You need to do the right 3 or 4.
Start by picking your biggest problem. Is it a wall blocking your view? Is it dark counters and poor light? Is it clutter you have been ignoring for two years? Solve that problem first.
If you are renting or on a tight budget, start here. Declutter your countertops today. Buy the right size area rug this week. Paint your kitchen and living room the same color next weekend. These three open concept kitchen ideas cost almost nothing and the difference is visible immediately.
If you own your home and have a medium budget, add consistent flooring and swap to open shelving. Both are weekend level projects with big results.
If you are ready to invest more, talk to a contractor about that wall. Get a structural engineer in first. Know what you are dealing with. Then decide.
Opening a kitchen does not happen all at once. It happens one smart decision at a time. These open floor plan kitchen ideas work because they each address a real problem, not because they look good on a mood board.
Pick one. Start there. Your kitchen will feel different by next week.