Bedroom Layering: Create Depth in 5 Steps

You have a bed, a nightstand, and a dresser. So why does your bedroom still feel like a waiting room?
That flat, boring feeling is frustrating. You bought nice furniture. You added pillows. But something is still missing. The room has no depth. No cozy factor. It looks staged, not lived in.
Here is what you will learn in this guide. First, what bedroom layering actually means. Second, the five layers that create depth from floor to ceiling. Third, how to mix textures without making a mess. And finally, the lighting tricks that make everything look better. No new furniture required.
Let’s fix that flat bedroom.
What Exactly Is Bedroom Layering?

Let’s clear up confusion first. Bedroom layering is not just adding pillows. It is not buying more decor. It is a system.
Bedroom layering means stacking visual and tactile elements in zones. Think foreground, midground, and background. A flat room has everything on the same plane. Your bed, your nightstand, your art — all at the same visual weight. That feels boring because your eye has nowhere to rest and nowhere to travel.
Here is the difference between decorating and layering. Decorating is one-off. You buy a rug because you like it. You hang art because it matches. Layering is intentional. Every piece talks to the next piece. The rough rug contrasts with the smooth sheets. The tall lamp balances the low bed frame.
Interior designers have a saying. Without layering, you have a mattress in a box. With it, you have a retreat. And here is the good news. You already own most of what you need. You just need to arrange it differently.
The 5 Layers of a Depth-Rich Bedroom

Think of your bedroom like a theater set. The stage needs a front, a middle, and a back. Your room is the same. Here are the five layers you need, starting from the ground up.
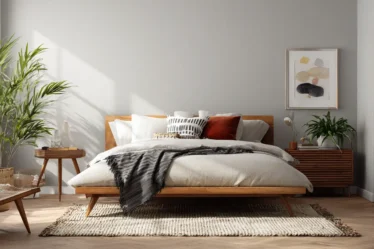
Layer one is the floor. This is your foundation. A flat room often has bare floors or one boring rug. Add a textured rug. Wool, jute, or a low-pile berber. If you have carpet, layer a smaller flat-weave rug on top. That alone creates contrast.
Layer two is your furniture base. Your bed frame, nightstands, and dresser. Depth comes from varied heights. A tall headboard next to a low nightstand. A floor lamp that reaches upward. Avoid matching sets. Matching sets kill depth because everything is the same height.
Layer three is bedding. This is where most people stop. But bedding alone is not enough. You need a mattress topper for fluff. A flat sheet folded at the foot. A quilt or blanket. Then a duvet. Then a throw. Each layer adds shadow and softness.
Layer four is the wall. Bare walls are depth killers. Add art, sconces, wood panels, or a large mirror. A mirror is cheating in the best way. It reflects light and doubles your visual space. Hang art at eye level. Not too high.
Layer five is ambient. This means lighting, plants, and scent diffusers. Plants add organic shapes. Lighting adds shadows. A diffuser adds nothing visual but changes how the room feels. Your senses all work together.
You do not need all five layers tomorrow. Start with two. The floor and the bedding. Then add walls. Then lighting. Progress beats perfection.
How to Layer Bedding for Instant Depth

The bed is sixty percent of your visual field. Get this right, and the rest of the room gets easier. Here is a simple system that works in any bedroom.
Start with a textured base. A quilted blanket or a waffle weave. This sits right over your fitted sheet. Why texture first? Because flat sheets are smooth. Smooth on smooth gives no contrast. A textured base creates tiny shadows.
Next add a mid layer. Take your flat sheet and fold it neatly at the foot of the bed. Do not tuck it in all the way. Leave it loose. This creates a horizontal line that breaks up the visual space.
Top with a lightweight duvet in a muted tone. Muted means not bright. Think oatmeal, clay, sage, or charcoal. Bright colors fight for attention. Muted colors recede, which creates depth.
Now add three to five pillows. Here is the exact formula that designers use. Two Euro pillows in back. Two standard pillows in front. One lumbar pillow in the very front. Then one kidney pillow if you have room. Vary the textures. Linen Euros, cotton standards, velvet lumbar.
Finally drape a throw asymmetrically. Do not fold it neatly. Drape it over one corner. Let it hang down the side of the bed. Asymmetry looks natural. Symmetry looks like a hotel room.
The 2026 rule of thirds for bedding is this. Sixty percent solid color. Thirty percent pattern. Ten percent wild texture like faux fur or bouclé. That ratio gives you depth without chaos.
Now step back. Do you see three distinct heights at the head of the bed? If yes, you have created depth. If not, adjust your pillow sizes.
Using Light and Shadow to Create Depth

Most people light for function. They want to see. But you should also light for drama. Light and shadow are free tools. Use them.
You need three types of light sources. First, ambient light. That is your overhead fixture or natural light from windows. Second, task light. A reading lamp on your nightstand. Third, accent light. A picture light above your art or an LED strip behind your headboard.
Here is why three sources matter. One overhead light creates flat, harsh shadows. It washes out texture. Add a warm lamp on one side, and suddenly your bedding looks different. The folds cast small shadows. The texture becomes visible.
Only use warm light. Look for 2700K to 3000K on the box. Cool white light belongs in garages and offices, not bedrooms. Cool light makes rooms feel sterile. Warm light makes rooms feel like a hug.
Position your lamps to cast angled light. Do not point them straight down. Point them across the wall or across your bedding. Angled light creates long shadows. Long shadows make the room feel deeper than it actually is.
A fifteen dollar smart bulb with warm dimming is your best depth tool. You can adjust brightness from your phone. Lower light in the evening. Higher light when you are getting dressed. One bulb changes the whole room.
And here is a trick from theater design. Put a small lamp on the floor behind a plant or behind a chair. Uplighting creates shadows on the ceiling. Shadows on the ceiling make the room feel taller. Taller feels deeper.
Texture Mixing Mistakes That Kill Depth

You have tried layering but it still looks flat. Here is why. You are making one of these four mistakes.
Mistake one is using textures that are too similar. Cotton sheets plus a cotton rug plus cotton curtains. That is all the same material. Your eye slides right over it because there is nothing to grab onto. The fix is easy. Swap one cotton item for wool, linen, leather, or velvet. Just one swap makes a difference.
Mistake two is no rough and soft contrast. A room full of soft textures feels mushy. A room full of rough textures feels harsh. You need both. A wool rug is rough. A silk pillow is soft. A leather headboard is smooth. A chunky knit throw is bumpy. Pair opposites.
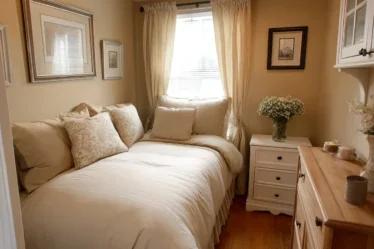
Mistake three is only using neutrals. Beige on beige on beige is not soothing. It is boring. You do not need bright colors. You need tonal variation. That means light beige, medium tan, dark brown, and off white. Same color family, different depths. That creates visual interest without screaming for attention.
Mistake four is forgetting vertical texture. Everything in your room sits at waist height or lower. That is a problem. Add something tall. A floor lamp with a textured shade. A hanging plant. Wall panels. A tall mirror. Vertical lines draw the eye up. Up feels more spacious.
Here is a texture audit you can do tonight. Walk around your room and touch every surface. Write down the material. Wood, glass, cotton, wool, metal, plastic. If you have three or more of the same material, replace one. That one swap will change the whole feel of the room.
Fix just one mistake tonight. Take a before photo. Change one texture. Take an after photo. You will see the difference in twenty four hours.
Putting It All Together
Bedroom layering is not complicated. You need five physical layers. Floor, furniture, bedding, walls, and ambient lighting. You need texture contrast. Rough next to soft. Smooth next to bumpy. You need warm light from three different sources.
Start with the floor or the bedding. Those two layers give you the biggest return for the least effort. Add one contrasting texture. Swap one cool light bulb for a warm one. Take a photo. Compare it to your room from last week. The difference will surprise you.
Pick one layer today. Just one. Add one contrasting texture. That is it. No shopping spree. No renovation. Ten minutes of rearranging.
Your bedroom should feel good to be in. Not just look good in photos. Depth creates comfort. Comfort helps you sleep. And better sleep changes everything else.
Now go fix that one flat spot. You already know how.
.