Introduction
That bathtub taking up half your bathroom? It might be the very thing making your space feel cramped, dark, and impossible to clean.
A lot of people worry that removing a tub is a mistake. They think it will hurt resale value or make the bathroom look unfinished. But here’s the truth: a shower-only bathroom can look better, feel bigger, and work harder than a bathroom with a tub you never use.
You just need the right ideas.
In this guide, you’ll get 18 real, actionable small bathroom shower ideas that work in 2026. Some cost under $100. Some are full renovations. All of them are things you can actually do.
You’ll also learn which layouts save the most space, which tile choices make a small shower feel twice as big, and which mistakes to avoid before you spend a single dollar.
Let’s get into it.
Why Removing the Tub Is Actually a Smart Move
A standard bathtub takes up about 12.5 square feet of floor space. In a small bathroom, that’s almost a quarter of the entire room.
When you remove it, you get that space back. You can use it for a larger shower, better storage, or just more room to move around. That’s not a compromise. That’s a trade-up.
A lot of homeowners worry about resale value. And yes, if you have only one bathroom in your home, keeping a tub might be smart for families with young kids. But if you have a second bathroom, or if you’re in a condo or apartment, a well-designed walk-in shower is often more attractive to buyers than a cramped tub nobody uses.
Shower-only bathrooms have been standard in Europe for decades. In the US, the trend has been catching up fast. According to the Houzz 2024 Bathroom Trends Study, walk-in showers are now the most popular feature in bathroom renovations across all age groups. Millennials and Gen Z buyers especially prefer them.
The fear of removing a tub is usually bigger than the actual problem. If your bathroom is small and the tub makes it feel like a closet, the smarter move is a shower-only layout done right.
The 3 Shower Layouts That Work Best in Small Bathrooms
Before you pick tiles or fixtures, you need to pick a layout. Everything else follows from this decision.
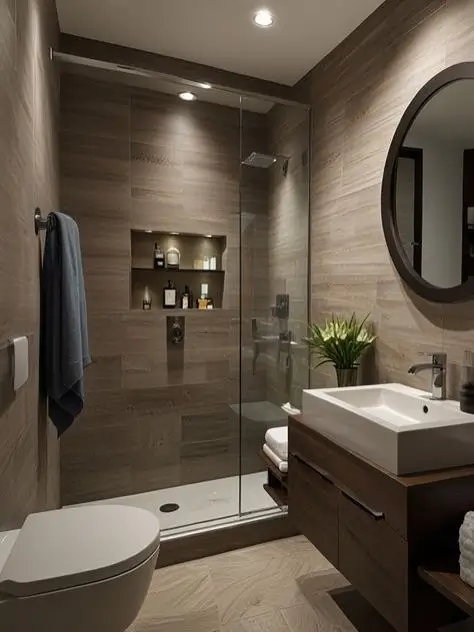
Corner Shower This works best in square bathrooms. You place the shower in one corner, which leaves the rest of the floor open. A neo-angle door (angled at 45 degrees) saves even more space because it doesn’t swing out into the room.
Alcove Shower This is the most common layout in narrow, rectangular bathrooms. Three walls surround the shower on three sides. The fourth side has a door or curtain. It’s practical, easy to waterproof, and works well even in tight spaces.
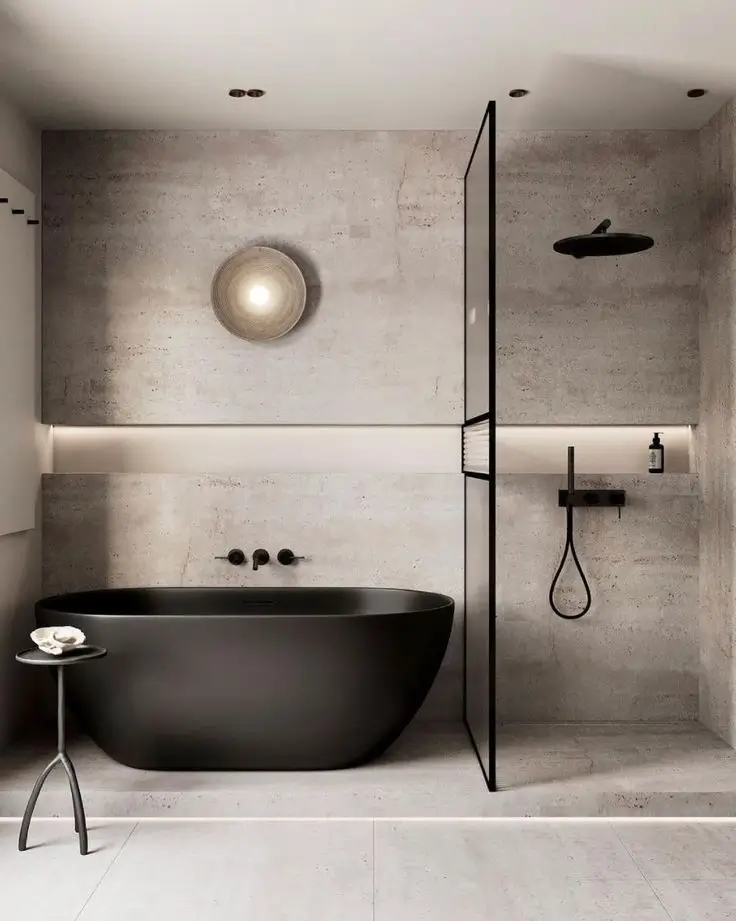
Wet Room This is the most open option. There’s no enclosure at all. The entire bathroom floor is waterproofed and sloped toward a drain. You shower in an open space. It feels luxurious and makes even the smallest bathroom feel much bigger. According to Houzz, searches for wet room designs increased by 34% in 2024.
Per the International Residential Code, the minimum shower size is 36 inches by 36 inches. That’s the legal floor, not the goal. If you have room for 48 by 36 inches or larger, your shower will feel noticeably more comfortable.
Once you know which layout fits your space, the rest of the design decisions get a lot easier.
18 Small Bathroom Shower Ideas You’ll Actually Use
Make It Feel Bigger
Idea 1: Floor-to-Ceiling Tiles
Vertical lines pull your eye upward. That tricks your brain into thinking the room is taller than it actually is.
Large format tiles, like 12×24 or 24×48 inches, have fewer grout lines. Fewer grout lines mean less visual noise. The wall looks cleaner and more open.
Soft whites, warm greiges, and pale sage greens work best in small spaces. They reflect light instead of absorbing it.
Actionable tip: Go with 12×24 tiles laid vertically. It’s one of the most effective changes you can make for under $200 in materials.
Idea 2: Frameless Glass Enclosure

A framed shower has thick metal borders around the glass. Those borders act like a visual wall. They break up the room and make it feel smaller.
A frameless glass enclosure removes all of that. The glass is almost invisible. Your eye travels through it instead of stopping at it.
Yes, frameless costs more. Expect to pay $300 to $900 more than a basic framed enclosure. But it’s one of the most dramatic visual changes you can make without moving a single wall.
Actionable tip: Even a 36×36 inch corner shower looks significantly more open with frameless glass.
Idea 3: Continuous Floor Tile Into the Shower

Most showers use a different tile inside than outside. That tile change creates a visual border. It tells your eye where the shower ends and the rest of the bathroom begins.
When you use the same tile on both surfaces, that border disappears. The bathroom reads as one continuous space. It feels bigger because there’s nothing breaking it up.
You’ll need proper waterproofing under the shower floor. Schluter Kerdi is a reliable membrane that contractors and DIYers both use.
Actionable tip: Pick one tile you love, buy enough for both surfaces, and use matching grout throughout.
Idea 4: Light-Colored Grout on Light Tile

Dark grout on light tile looks bold. It also creates a grid pattern across every wall and floor surface. In a small space, that grid can feel busy and visually shrinking.
Matching your grout color to your tile makes the surface look seamless. The tile seems to flow instead of being cut into small squares.
Actionable tip: If you love white subway tile, use white or light gray grout. The difference in how spacious the room feels is immediate.
Storage Without Wasting Space
Idea 5: Recessed Niche Shelves

A niche shelf is built into the wall between the studs. It doesn’t stick out into the shower at all. You get storage without losing a single inch of floor or shower space.
A typical niche is 12 inches wide by 24 inches tall. That’s enough space for shampoo, conditioner, and body wash in full-size bottles.
You can tile the inside to match the shower walls or use a contrasting tile to make it a design feature.
Actionable tip: A single niche costs $50 to $150 in materials if you DIY. It’s one of the best storage upgrades you can make.
Idea 6: Fold-Down Teak Bench

A permanent bench takes up floor space even when no one is using it. A fold-down bench solves that problem.
When you need it, fold it down. When you don’t, fold it back up. The shower stays open.
Teak is the best material for this because it resists moisture naturally. It doesn’t rot, crack, or need regular sealing.
Brands like Smedbo and Barclay make quality fold-down teak benches. You can also build one from teak strips if you’re handy.
Actionable tip: Mount it at 17 to 19 inches from the floor. That’s the standard seat height and the most comfortable for sitting.
Idea 7: Magnetic or Adhesive Holders

Drilling into shower tile to add shelves is a commitment. And it’s a real risk if you ever want to change things.
Magnetic holders like Hasko or Tooletries attach to the wall without drilling. They hold soap, razors, and bottles cleanly. They’re also easy to reposition.
This is especially useful for renters who can’t make permanent changes.
Actionable tip: Use a holder rated for bathroom humidity. Cheap adhesive holders fail fast in wet conditions.
Lighting That Changes How the Shower Feels
Idea 8: Recessed Ceiling Lights Inside the Shower

Most bathrooms have one overhead light near the vanity. That light barely reaches the shower. The result is a dim, cave-like shower even in a beautiful bathroom.
Adding two or three recessed lights directly above the shower changes everything. The space feels brighter, cleaner, and more open.
You need IP65-rated recessed lights for shower zones. That’s the waterproof rating required by code for areas with direct water exposure.
Actionable tip: Two 4-inch recessed lights in a 3×4 foot shower will make a visible difference. This is worth hiring an electrician for if you’re not comfortable with wiring.
Idea 9: Backlit Mirror at the Vanity

A backlit mirror doesn’t just help you see better. It pushes light across the whole room, including toward the shower.
You also get a spa-like glow that makes the entire bathroom feel more intentional. It’s a design upgrade that does double duty.
LED backlit mirrors range from $80 to $250. Most come with anti-fog built in, which is a practical bonus in a small bathroom with limited ventilation.
Actionable tip: Look for mirrors with adjustable color temperature. Warm light feels relaxing. Cool light is better for getting ready in the morning.
Idea 10: Frosted Window or Solar Tube Skylight

Natural light makes any space feel bigger. Even a small 12×12 inch frosted window in the shower wall changes the atmosphere completely.
If adding a window isn’t possible, a solar tube skylight is a low-cost alternative. It’s a tube that runs from your roof to the ceiling, capturing daylight and sending it into the room below. Installation typically costs $200 to $600.
Actionable tip: Frosted glass gives you privacy while still letting in full light. Don’t skip this option if your bathroom has an exterior wall.
Tile Patterns and Materials That Stand Out
Idea 11: Subway Tile in a Herringbone Pattern

Subway tile is one of the most affordable options out there. It’s also one of the most overused when laid in a simple stacked or brick pattern.
Lay the same tile in a herringbone pattern and it looks completely different. More interesting. More considered. More expensive-looking than it actually is.
Herringbone works especially well in alcove showers because the diagonal lines add movement to what would otherwise be a plain rectangular space.
Actionable tip: White subway tile in a herringbone pattern with light gray grout is one of the most timeless looks in bathroom design. It costs about the same as a standard installation.
Idea 12: Penny Tile on the Floor

Penny tiles are small, round tiles about one inch in diameter. They come mounted on mesh sheets, which makes installation straightforward.
They provide natural grip underfoot, which matters in a wet shower floor. And their small scale actually works in your favor in a small shower. They don’t compete with the walls visually.
Actionable tip: Use white or light gray penny tile on the floor with a darker grout. The grout contrast adds texture and hides grime better than light grout.
Idea 13: River Pebble Floor

Pebble tile floors bring a natural, spa-like feel to a small shower. The texture underfoot is genuinely satisfying.
You can start with a pebble mat from most home improvement stores for $30 to $80. Full pebble tile installation runs $8 to $20 per square foot.
It’s not for everyone. Pebble floors require more grout maintenance than flat tile. But if you want a bathroom that feels like a retreat, this is one of the fastest ways to get there.
Actionable tip: Seal the grout on pebble floors twice a year to prevent staining and mildew buildup.
Idea 14: Zellige Tile Accent Wall

Zellige tile is handmade Moroccan tile. Each piece is slightly irregular. That imperfection is the point.
Because the surface isn’t perfectly flat, it catches light at different angles throughout the day. The wall looks alive. It adds depth and texture that no printed or machine-made tile can replicate.
One accent wall in zellige tile instantly becomes the focal point of the entire bathroom. You don’t need to cover every surface.
Zellige is pricier, around $15 to $40 per square foot, but you only need it on one wall.
Actionable tip: Pair zellige with plain, flat tile on the other walls so the accent wall stands out instead of competing.
Fixtures That Do More With Less Space
Idea 15: Rain Shower Head Plus Handheld Combo

A ceiling-mounted rain shower head makes any shower feel more luxurious. Water falls straight down instead of at an angle. It’s a noticeably different experience.
Pairing it with a handheld unit on a slide bar gives you flexibility. You can rinse hard-to-reach areas, clean the shower itself, or help someone who needs a more controlled water stream.
Budget-friendly combos under $150 include the Moen Magnetix and the Delta In2ition. Both are widely available and easy to install yourself.
Actionable tip: Make sure your water pressure supports a rain head before buying. Low pressure makes rain heads feel underwhelming.
Idea 16: Thermostatic Valve

A standard shower valve requires you to adjust the temperature every single time. You turn it on, wait for it to get warm, fiddle with the balance. It wastes water and time.
A thermostatic valve remembers your preferred temperature. You set it once. Every shower after that starts at exactly the right temperature within seconds.
Kohler, Moen, and GROHE all offer entry-level thermostatic valves. They cost more upfront, but they save water and genuinely make daily showers better.
Actionable tip: Pair a thermostatic valve with a pause function so you can stop the water mid-shower without losing your temperature setting.
Idea 17: Matte Black or Brushed Gold Hardware
Finish matters more than most people realize.
Chrome is the default. It’s also the most visually forgettable option. Matte black or brushed gold hardware immediately signals that the bathroom was designed on purpose.
Matte black has a practical advantage too. It hides water spots far better than chrome. In a small shower that doesn’t have perfect ventilation, that makes a real difference in daily maintenance.
Actionable tip: Pick one finish and commit to it across every fixture. Showerhead, valve, towel bar, and toilet paper holder should all match. Mixing finishes works when it’s intentional, but it’s easy to get wrong.
The Bonus Idea
Idea 18: Full Wet Room With Bench and Heated Floor

This is the big one.
A wet room removes every enclosure. No door. No glass panel. The entire bathroom floor is waterproofed and sloped toward a central or linear drain. You walk in and shower in open space.
It’s the most open, most spa-like experience you can create in a small bathroom. And it works best in small spaces because there are no walls cutting the room into pieces.
Add a built-in bench and a heated floor, and you have a bathroom that feels genuinely luxurious.
Heated floor systems from Nuheat, Warmup, or Schluter DITRA-HEAT cost $5 to $15 per square foot installed. For a 50 square foot bathroom, that’s $250 to $750. That’s not cheap, but stepping out of a warm shower onto a warm floor on a cold morning is hard to put a price on.
Actionable tip: Make sure your subfloor is structurally sound before doing a wet room conversion. Wet rooms require a full waterproof membrane on the floor and lower walls. Don’t skip this step or cut costs here.
Common Mistakes That Ruin Small Shower Designs
Even good ideas go wrong when you make these mistakes. Here are the five most common ones.
Using a door that swings inward. In a small shower, a door that opens inward means you have to step back every time you open it. That’s awkward at best and a fall risk at worst. Use a sliding door, a pivot door that swings outward, or no door at all.
Choosing dark tiles without planning the lighting. Dark tiles can look stunning. But in a small shower without good lighting, they make the space feel like a cave. If you want dark tiles, plan for recessed ceiling lights and a backlit mirror before you commit.
Skipping waterproofing to save money. Waterproofing failure is one of the most common reasons shower renovations need to be redone entirely. A proper membrane like Schluter Kerdi costs $1 to $3 per square foot. Fixing water damage to walls and subfloors costs thousands. This is not where you cut the budget.
Installing the shower head too low. The standard installation height is 80 inches from the floor. In a small shower, aim for 84 inches or higher. A low shower head forces taller users to crouch and makes the space feel smaller than it is.
Forgetting ventilation. Mold grows fast in small, humid spaces. The Home Ventilation Institute recommends at least 1 CFM of exhaust fan power per square foot of bathroom, with a minimum of 50 CFM for any bathroom. If your fan is old or undersized, replace it before you renovate. Fixing mold after a new tile job is expensive and frustrating.
What Small Shower Upgrades Actually Cost
You don’t need a full gut renovation to transform a small shower. Here’s a realistic breakdown by budget.
Under $500 This is the refresh budget. New showerhead ($50 to $150), magnetic storage holders ($20 to $40), a new shower curtain or liner, a river pebble mat, and fresh caulk. These changes are visible and immediate. You can do all of them in a weekend.
$500 to $2,000 This is the upgrade budget. New tile for one or two walls, a basic frameless glass panel, recessed niche installation, new fixtures, and a backlit mirror. You’ll likely need a plumber for fixture work and possibly a tile setter for walls. This level of investment changes how the bathroom looks entirely.
$2,000 to $8,000 and above This is the renovation budget. Full tile replacement, new layout, frameless glass enclosure, thermostatic valve, heated floor, and wet room conversion all fall here. This is a real remodel. It takes time and a licensed contractor for most of the work. But done right, it adds real value to your home.
According to data from Angi, the average bathroom remodel in 2024 ran between $6,600 and $16,000. A shower-only renovation, with no tub, typically costs $1,500 to $5,000 for mid-range materials and professional installation.
Where to save: Basic tile from Floor and Decor, TileBar, or BuildDirect. Standard fixtures from Moen or Delta. DIY niche installation.
Where to spend: Frameless glass. Waterproofing membrane. A good exhaust fan. These are the things that protect your investment long term.
How to Pick the Right Tile for a Small Shower
Tile is the most important visual decision in a small shower. Get it right and everything else falls into place.
Start with the floor. The floor tile needs to have a DCOF (Dynamic Coefficient of Friction) rating above 0.42. That’s the wet slip-resistance standard from the Tile Council of North America. Anything below that is a safety risk in a wet shower floor. Penny tile, pebble tile, and textured porcelain all pass this standard.
Then pick the wall tile. Larger tiles reduce grout lines and make walls look cleaner. A 12×24 inch tile has far fewer grout lines than a 4×4 inch tile on the same wall. In a small shower, fewer lines mean a bigger, calmer feeling.
Know the material options. Porcelain is dense, water-resistant, and durable. It works in any shower. Ceramic is slightly less dense and works well for walls but is a weaker choice for floors. Natural stone looks beautiful but needs regular sealing to prevent staining and water damage.
Think about color honestly. Light tiles make a small shower feel open and bright. Dark tiles make it feel cozy, moody, and intentional. But dark only works if you’ve planned for enough light. Without good lighting, dark tiles just make a small shower feel smaller.
Light colors plus large format tiles give you the biggest, brightest result. Dark tiles plus recessed lighting plus a frameless glass door give you drama without claustrophobia. Both approaches work. Just pick one and commit to it.
Conclusion
A small bathroom without a tub is not a problem. It’s an opportunity.
When you remove the tub, you get back valuable floor space. You get a shower that can be designed exactly the way you want it. And you get a bathroom that can feel bigger, cleaner, and more purposeful than it ever did before.
These 18 small bathroom shower ideas cover every budget and every style. Some you can do this weekend. Some require a contractor and a few weeks of work. But every single one moves you toward a shower-only bathroom that looks intentional, not incomplete.
Pick two or three ideas that fit your space and your budget. Start with the one that would make the biggest visual impact. Even one change, like frameless glass or floor-to-ceiling tile, can transform how your entire bathroom feels.
Your shower deserves to be the best part of your morning.